
kotak shoutbox,kotak cuap cuap,kotak komentar,kotak curhatan dan masih banyak lagi istilah yang dipakai oleh para blogger.tapi intinya kotak ini berguna untuk menuliskan uneg uneg atau jejak kamu setelah berkunjung kesalah satu blog.jadi nanti pemilik blog bisa membacanya dan kemudian bisa langsung membalas di kotak itu juga.kota ini lebih praktis ketimbang kotak komentar.karena kalo kotak ini bisa diletakkan dihalaman depan,sedangkan kotak komentar adanya di setiap postingan.
cara memasang shoutbox atau kotak ngoceh:
1. Buka situs Shoutmix terlebih dahulu kamu harus daftar.tenang saja gampang kok.cukup klik "create your shoutbox now"
2. Jika pendaftarannya berhasil kamu langsung disuruh milih type shoutbox yang disediakan, terserah kamu milih bentuknya yang gimana. Klik tombol Continue
3. Setelah itu kamu akan mendapat ucapan "Terima Kasih" lalu klik link Go to My Control Panel Now
4. Disitu kamu bisa mensetting terlebih dahulu shoutbox kamu, misalnya Style & Color, Date & Time, dan lain-lain.
5. Jika sudah selesai klik menu Get Codes
6. Jika kamu ingin menaruh shoutbox di blog kamu pilih "Place Shoutbox on Webpage"
7. Atur lebar dan tinggi shoutbox di kolom widht dan hight
8. Kemudian Copy kode yang ada di dalam kotak "generated Codes"
sekarang kita akan meletakkan kode itu dialam blog
1.Login ke blogger-Layout-Add Page Elements
2. Tambahkan element HTML/Javascript.
3.Paste Kode yang telah kamu copy dari shoutbox.com
4.kemudian save..sekarang liat blog kamu.udah tambah satu kotak cuap cuap disana..
selamat ngoceh!!!
Read More..
Selasa, 30 Desember 2008
Senin, 29 Desember 2008
Memasang adense(iklan) didalam postingan
ingin menghasilkan duit dari blog kamu?mudah kok..pasang iklan di blog kamu.banyak kok web yang bersedia membayar kamu apabila kamu mau nampilin iklan mereka di blog kamu.jadi saat ada iklan di blog kamu yang diklik,kamu akan langsung dibayar oleh web tersebut.jika blog kamu berbahasa indonesia,kamu bisa coba mendaftar disini .Tapi kalo blog kamu berbahasa inggris,kamu bisa coba daftar di google adsense,adbrite,atau advertiser.lumayan kan sambil ngeblog bisa ngasilin duit.
sekarang yang jadi masalah,terkadang walaupun blog kita sudah rame pengunjungnya tapi kok kenapa blog kita belum menghasilkan...
berarti peletakan iklan dalam blog kamu kurang maksimal.supaya lebih maksimal.sebaiknya kamu coba untuk memasang iklan didalam postingan.nanti iklan ini akan berada di bawah judul postingan anda.jadi saat pengunjung membaca postingan anda.mereka akan dipaksa melihat iklan anda tersebut.
cara memasang iklan didalam postingan :
1.login ke blogger
2.layout-edit html
3.terus ambil kode iklan yang telah disiapkan di web iklan yang telah anda daftar tadi
4.cari kode dibawah ini
<div class='post-header-line-1'/>
5.sekarang kita akan meletakkan kode iklan yang telah kita dapatkan tepat dibawah kode di no 4...tapi sebelum meletakkan kode iklan tersebut.kita harus memparse kode tersebut terlebih dahulu.liat cara memparse kode disini
6.setelah kode iklan di parse.letakkan kode tersebut dibawah kode no 4
7.kemudian simpan..sekarang kamu sudah bisa melihat hasilnya
Read More..
Minggu, 28 Desember 2008
Membuat kotak komentar dibawah postingan
Selama ini untuk memberikan komentar blog,kita selalu harus mengklik "post comment" terlebih dahulu baru kita bisa mengisi komentar disana.itu akan sangat merepotkan.tapi sekarang blogger telah menyediakan cara yang lebih mudah.blogger telah meletakkan kotak komentar tepat dibawah postingan.jadi saat ada pengunjung yang ingin memberikan komentar.merka langsung bisa mengisi komentar tanpa harus klik "post comment" terlebih dahulu
untuk membuatkotak komentar dibawah postingan,ikuti langkah langkah dibawah ini:
1. Login ke http://draft.blogger.com jangan login ke blogger.com ya!!!
2. Trus ke menu Setting-Comments.Kemudian ganti "Comment Form Placement" menjadi "Embedded below post" silahkan lihat gambar dibawah ini :
nah coba sekarang kembali ke blog anda.terus coba klik salah satu postingan.nah kotak komentar udah ada di blog anda...selamat mencoba Read More..
untuk membuatkotak komentar dibawah postingan,ikuti langkah langkah dibawah ini:
1. Login ke http://draft.blogger.com jangan login ke blogger.com ya!!!
2. Trus ke menu Setting-Comments.Kemudian ganti "Comment Form Placement" menjadi "Embedded below post" silahkan lihat gambar dibawah ini :

3.lalu di save
4.kemudian masuk ke menu layout-edit html
5.beri tandang centang pada kotak "Expand widget templates"
6.cari kode dibawah ini
<p class='comment-footer'>
<a expr:href='data:post.addCommentUrl' expr:onclick='data:post.addCommentOnclick'>
<data:postCommentMsg/></a>
</p>
</b:if>
7.lalu ganti kode itu dengan kode dibawah ini:
<p class='comment-footer'>
<b:if cond='data:post.embedCommentForm'>
<b:include data='post' name='comment-form'/>
<b:else/> <b:if cond='data:post.allowComments'>
<a expr:href='data:post.addCommentUrl' expr:onclick='data:post.addCommentOnclick'>
<data:postCommentMsg/></a>
</b:if> </b:if> </p> </b:if>
nah coba sekarang kembali ke blog anda.terus coba klik salah satu postingan.nah kotak komentar udah ada di blog anda...selamat mencoba Read More..
Sabtu, 27 Desember 2008
Memasang total post dan total coment
Anda bisa memasang total jumlah artikel yang telah anda posting dan berapa total jumlah komentar yang telah di tulis dalam blog anda.sehingga pengunjung yang datang bisa melihat dan mengetahui jumlah postingan dan jumlag artikel dalam blog anda.untuk memasangnya cukup copy code code berikut
1.script untuk total post
<script style="text/javascript">
function showpostcount(json) {
document.write('Total Posts : <b>' + parseInt(json.feed.openSearch$totalResults.$t,10) + '</b><br>');}</script>
<script src="http://namablog.blogspot.com/feeds/posts/default?alt=json-in-script&callback=showpostcount"></script>
ganti tulisan yang dicetak tebal dengan alamat blog anda.
ganti tulisan yang dicetak tebal dengan alamat blog anda
silahkan letakkan code code berikut didala page element blog anda..caranya
1.login ke blogger
2.layout-page element-add gadgedt-add html/javascript
3.paste code code diatas
4.simpan
1.script untuk total post
<script style="text/javascript">
function showpostcount(json) {
document.write('Total Posts : <b>' + parseInt(json.feed.openSearch$totalResults.$t,10) + '</b><br>');}</script>
<script src="http://namablog.blogspot.com/feeds/posts/default?alt=json-in-script&callback=showpostcount"></script>
ganti tulisan yang dicetak tebal dengan alamat blog anda.
2.script untuk total comment
<script style="text/javascript"></script><script style="text/javascript">function numberOfComments(json) {document.write('Total Comments : <b>' + json.feed.openSearch$totalResults.$t + '</b><br>');}</script><script src="http://namablog.blogspot.com/feeds/comments/default?alt=json-in-script&callback=numberOfComments"></script>
ganti tulisan yang dicetak tebal dengan alamat blog anda
silahkan letakkan code code berikut didala page element blog anda..caranya
1.login ke blogger
2.layout-page element-add gadgedt-add html/javascript
3.paste code code diatas
4.simpan
Jumat, 26 Desember 2008
Seberapa Mahal Blog anda
Punya blog yang lumayan lama,terkenal,dan banyak pengunjungnya...mau tahu seberapa mahal sih harga blog anda?anda bisa mengecek berapa blog anda dihargai..memang sih kita gak bisa menjual blog kita,tapi setidaknya jika kita tahu harga blog kita.kita jadi bisa menilai seberapa penting sih blog kita tersebut.mari kita cek sama sama blog kita
caranya kunjungi http://www.business-opportunities.biz/projects/how-much-is-your-blog-worth
lalu masukkan alamat blog anda disana.nanti akan keluar harga blog anda dalam dollar.semakin rame dan semakin banyak artikel dalam blog anda..maka akan mahal juga harga blog anda.anda juga bisa mencoba memasukkan alamat blog yang abru anda buat untuk mengetahui berapa harga blog anda.
ok selamat mencoba semoga anda bisa mendapatkan hasil yang memuaskan...
Read More..
Kamis, 25 Desember 2008
membuat recent comment
ingin tahu siapa saja yang baru memberikan komentar di blog anda?bisa kok...pasang aja recent comment.widget ini berfungi untuk menampilkan komentar terbaru yang dituliskan oleh pengunjung di blog anda.bagaimana cara membuatnya
1.login ke blogger
2.pilih layout-add page element-add gadgedts-add html/javascript
3.copy code dibawah ini:
<script style="text/javascript" src="http://kendhin.890m.com/comments.js"></script><script style="text/javascript">var a_rc=8;var m_rc=false;var n_rc=true;var o_rc=40;</script><script src="nama blogmu/feeds/comments/default?alt=json-in-script&callback=showrecentcomments"> </script>
catatan:
a.ganti tulisan nama blogmu dengan alamat blog anda.
b.angka 8 menunjukkan jumlah komentar yang ingin ditampilkan
4.kemudian simpan
5.anda bisa mengatur untuk meletakkan widget ini di halaman blog anda. Read More..
Rabu, 24 Desember 2008
Menuliskan script dalam postingan
Jika didalam blog anda,anda ingin memberikan tips tips seputar blog..seperti cara memasang status yahoo messenger di blog, cara membuat random post,cara membuat related post,dan masih banyak lagi...anda harus meletakkan script script didalam postingan anda.seperti kita tahu,untuk meletakkan script didalam postingan tidaklah bisa dilakukan.karena jika anda meletakkan code script tersebut didalam postingan.maka script tersebut otomatis akan langsung dijalankan.lalu bagaimana cara menampilkan script didalam postingan?untuk melakukannya anda harus mem "parse" terlebih dahulu script script tersebut
mem parse disini berarti anda harus mengganti beberapa tanda yang ada didalam script tersebut...
mem parse disini berarti anda harus mengganti beberapa tanda yang ada didalam script tersebut...
jika tidak ingin repot anda bisa melakukan dengan beberapa cara
1.Gunakan software-software web design, misalnya Macromedia Dreamwaver, Microsoft Frontpage, Namao Web Editor.
Atau bisa juga dengan software-software blogtools seperti post2blog dll.- Trus tuliskan semua kode pada area design, kemudian copy kode-kode tersebut dari area HTML Code. Nha kode-kode dalam area HTML Code tersebut lah yang harus diposting.
2.kunjungi web http://www.blogcrowds.com/resources/parse_html.php
Web ini menyediakan fasilitas untuk memparse code script
anda cukup mengcopy script tersebut ke web itu lalu klik parse..
mudah bukan?
Selasa, 23 Desember 2008
Membuat Recent Post
Recent post berfungsi menampilkan postingan terbaru.jadi pengunjung yang datang bisa tahu postingan mana yang abru saja ditulis.bagaimana cara membuat recent post.akan diajarkan langkah langkahnya.
seperti biasa anda cukup menambahkan kode berikut di dalam page element blog anda...lihat code dibawah ini:
<script src="http://agsap12.googlepages.com/Postbaru.js"></script><script>var numposts = 10; var showpostdate = true; var showpostsummary = true; var numchars = 100; </script><script src="http://tips-tutorial-blog.blogspot.com/feeds/posts/default?orderby=published&alt=json-in-script&callback=rp"> </script>
catatan:
1.ganti alamat blog http://tips-tutorial-blog.blogspot.com/ dengan alamat blog anda.
Read More..Gratis subdomain.purworejo.asia
Bagi warga bloger Purworejo pada khususnya dan warga bloger dimana saja yang mau menggunakan subdomain purworejo.asia dan yang memakai account blogspot bisa mengubah url yang semula http://subdomain-anda.blogspot.com menjadi http://subdomain-anda.purworejo.asia tanpa biaya sedikitpun alias gratis. Yang terpenting adalah anda sudah punya account di google sehingga bisa membuat blog di blogger.com, atau pun anda memang sudah punya subdomain di blogspot. Adapun langkah dan caranya silahkan lihat di http://www.purworejo.asia
Read More..
Senin, 22 Desember 2008
Blogger Templates: Psi

This free Blogger template webdesign is based on the Blogger page color theme. It can be either a 3- or 5-column template. If you want a 3-column template, simply don't fill in the lowerbar widgets and make its colors blend with the post column.
The left sidebar is 120 px wide, and the right sidebar is 200 px wide, perfect for vertical and square Adsense boxes.
Features
- The "Read more..." function is available to shorten posts.
- Almost all colors and fonts are easy to customize.
- Blog Posts Edit buttons are fully functional.
- Flexible number of sidebars.
- Menubar below the header for easy navigation.
- Header image can be easily changed.
- Tested ok in all browsers using Browsershots.org.
Help links: template installation guides and instructions.
Header Image
To put the header image in your blog, click on the image below to open up a larger size and save it into your computer. Then, upload the image using the Layout > Page Elements > Header Edit tab. If you want to use your own image for the header, the image width has to be 980 pixels (with any height).

Header image adapted from wallpaperstock.net (credit accordingly if use).
Terms of Use
This new XML Blogger template is free but please value our hours of design work by leaving the footer credit to Ourblogtemplates.com intact.
Read More..
XML Blogger Templates: Newspaper III

This free Blogger template webdesign is based on a newspaper theme. It can be either a 3- or 6-column template. If you want a 3-column template, simply don't fill in the lowerbar widgets and blend its colors with the post column.
The sidebars are 200 px wide, perfect for the large square Adsense box. The grey sections below the menubar and above the lowerbar are perfect to place text ads, image ads, or link ads.
Similar templates: Newspaper (right sidebar), Newspaper II (left sidebar).
Features
- The "Read more..." function is available to shorten posts.
- Almost all colors and fonts are easy to customize.
- Blog Posts Edit buttons are fully functional.
- Flexible number of sidebars.
- Menubar below the header for easy navigation.
- Header image can be easily changed.
- Tested ok in all browsers using Browsershots.org.
Help links: template installation guides and instructions.
Header Image
To put the header image in your blog, click on the image below to open up a larger size and save it into your computer. Then, upload the image using the Layout > Page Elements > Header Edit tab. If you want to use your own image for the header, the image width has to be 990 pixels (with any height).

Header image credit: adapted from David Niblack (credit accordingly if used).
Terms of Use
This new XML Blogger template is free but please value our hours of design work by leaving the footer credit to Ourblogtemplates.com intact.
Read More..
Blogger Templates: Blogger Theme II

This free Blogger template webdesign is based on the Blogger page color theme. It can be either a 2- or 5-column template. If you want a 2-column template, simply don't fill in the lowerbar widgets and make its colors blend with the post column.
The left sidebar is 230 px wide, perfect for the large square Adsense box.
Features
- The "Read more..." function is available to shorten posts.
- Almost all colors and fonts are easy to customize.
- Blog Posts Edit buttons are fully functional.
- Flexible number of sidebars.
- Menubar below the header for easy navigation.
- Header image can be easily changed.
- Tested ok in all browsers using Browsershots.org.
Help links: template installation guides and instructions.
Header Image
To put the header image in your blog, click on the image below to open up a larger size and save it into your computer. Then, upload the image using the Layout > Page Elements > Header Edit tab. If you want to use your own image for the header, the image width has to be 900 pixels (with any height).

Header image adapted from Wallpaperpimper (credit accordingly if use).
Terms of Use
This new XML Blogger template is free but please value our hours of design work by leaving the footer credit to Ourblogtemplates.com intact.
Read More..
Membuat Menu Dropdown Standart
Menu Dropdown sangat berguna untuk ditarok didalam blog kita.karena dengan membuat menu dropdown di blog,akan menghemat banyak space di blog kita.dan space space tersubut bisa kita gunakan untuk keperluan lain..seperti pemasangan iklan dan lainnya.coba anda bayangkan jika anda punya 100 link yang ingin ditampilkan di blog.maka akan banyak sekali space di blog yang dibutuhkan.cara Membuat Menu Dropdown Standart :
1.login ke blogger
2.masuk ke layout-page element-add gadgedts-add html
3.copy code berikut :
<span class="fullpost">
<form name="jump">
<select onchange="location=" name="menu" value="GO"> <option value="http://alamat-url1.com">Menu1</option> <option value="http://alamat-url2.com">Menu2</option> <option value="http://alamat-url3.com">Menu3</option></select>
</form>
</span>
Read More..
1.login ke blogger
2.masuk ke layout-page element-add gadgedts-add html
3.copy code berikut :
<span class="fullpost">
<form name="jump">
<select onchange="location=" name="menu" value="GO"> <option value="http://alamat-url1.com">Menu1</option> <option value="http://alamat-url2.com">Menu2</option> <option value="http://alamat-url3.com">Menu3</option></select>
</form>
</span>
4.silahkan ganti tulisan berwarna merah dengan alamat link yang akan anda tarok disana
Contoh Menu Dropdown Standart
Read More..
Minggu, 21 Desember 2008
Menilai Kualitas Tulisan Anda
Seberapa bermanfaat dan seberapa berkualitas tulisan anda di blog?anda bisa menilai seberapa berkualitas tulisan anda dengan menambahkan widget "blogratings".dengan blograting ini anda dapat menampilkan rating pada setiap tulisan yang anda post di blog.
blograting bekerja dengan cara mengambil nilai vote jika ada pengunjung yang mengklik icon star.jadi semakin banyak yang klik icon tersebut akan ketahuan seberapa berkualitas tulisan anda.ada 5 pilihan bintang yang bisa anda pilih.Bad,boring,Ok,Good dan excelent.Widgets ini support pada beberapa blog diantaranya Blogger, TypePad, WordPress dan javascript untuk installasi manual.
jika berminat silahkan daftar disini:
http://www.outbrain.com/users/login.vm?r=login
Read More..
Sabtu, 20 Desember 2008
Menampilkan Random Post
Semakin bertambahnya postingan di blog anda,lambat laun postingan anda yang lama akan tenggelam jauh diantara ratusan postingan anda yang lain.padahal ada beberapa postingan yang menurut anda penting dan banyak di cari oleh pengunjung.Anda bisa menyiasatinya dengan memasang random post.jadi postingan anda yang terdahulu bisa tampil kembali.ok sekarang kita menuju ke langkah cara pembuatannya
1.login blogger
2.masuk ke layout-pahe element-add gadgedts-add hatml/javascript
3.copy kode berikut
<script type="text/javascript">
function pipeCallback(obj) {
document.write('<ul style="text-transform: capitalize;">');
var i;
for (i = 0; i < obj.count ; i++)
{
var href = "'" + obj.value.items[i].link + "'";
var item = "<li>" + "<a href=" + href + ">" + obj.value.items[i].title + "</a> </li>";
document.write(item);
}
document.write('</ul>');
}
</script>
<script src="http://pipes.yahoo.com/pipes/pipe.run?_render=json&_callback=pipeCallback&_id=022620be5e6f6a66359d63edb5055e66&url=http%3A%2F%2Fnamablog.blogspot.com&num=10" type="text/javascript"></script>
<span style="gt;Widget edited by <a href="http://anangku.blogspot.com/2008/08/blogger-random-post-widget.html">Anang </a></span>
Read More..
1.login blogger
2.masuk ke layout-pahe element-add gadgedts-add hatml/javascript
3.copy kode berikut
<script type="text/javascript">
function pipeCallback(obj) {
document.write('<ul style="text-transform: capitalize;">');
var i;
for (i = 0; i < obj.count ; i++)
{
var href = "'" + obj.value.items[i].link + "'";
var item = "<li>" + "<a href=" + href + ">" + obj.value.items[i].title + "</a> </li>";
document.write(item);
}
document.write('</ul>');
}
</script>
<script src="http://pipes.yahoo.com/pipes/pipe.run?_render=json&_callback=pipeCallback&_id=022620be5e6f6a66359d63edb5055e66&url=http%3A%2F%2Fnamablog.blogspot.com&num=10" type="text/javascript"></script>
<span style="gt;Widget edited by <a href="http://anangku.blogspot.com/2008/08/blogger-random-post-widget.html">Anang </a></span>
ganti namablog.blogspot.com dengan nama blog anda...
4.kemudian saveRead More..
Jumat, 19 Desember 2008
Membuat kolom blogger Login
Untuk masuk ke account blogger,kita harus mengetikkan terlebih dahulu alamat blogger.com di browser kita.ternyata ada cara yang lebih cepat untuk masuk ke account kita tanpa mengetikkan terlebih dahulu alamat blogger.caranya adalah memasang kolom login di blog kita.jadi nanti saat kita mau login ke account blog kita,kita tinggal memasukkan user name dan pasword kita di kolom tersebut.lebih praktis bukan?Tenang saja widget ini tidak akan membuat berat blog anda.mau tahu caranya?
1.login ke blog anda
2.masuk ke layout-page element-add gadgedts-add html/java script
3.copy code dibawah ini :
Please enter your username and password to enter your Blogger Dasboard page!<br/><br/><form id="start-login" action="https://www.google.com/accounts/ServiceLoginBoxAuth" name="login" onsubmit="onlogin()" method="post"><input value="http://www.blogger.com/loginz?d=%2Fhome&p=http%3A%2F%2Fwww.blogger.com%2F" name="continue" type="hidden"/><input value="blogger" name="service" type="hidden"/><input value="8" name="nui" type="hidden"/><input value="8" name="naui" type="hidden"/><input value="2" name="fpui" type="hidden"/><input value="3" name="uilel" type="hidden"/><input value="true" name="skipvpage" type="hidden"/><input value="false" name="rm" type="hidden"/><input value="true" name="alwf" type="hidden"/><input value="http://www.blogger.com/login.g" name="roeu" type="hidden"/><input value="0" name="alinsu" type="hidden"/><input value="WbQ8QiJfUvA" name="GA3T" type="hidden"/><div><label for="Email"> Username: <br/><input id="Email" tabindex="1" value="" name="Email" size="20" type="text"/></label></div><div><label for="Passwd"> Password: (<a href="https://www.blogger.com/forgot.g" target="_top" title="Forgot your password?">?</a>) <br/></label><input id="Passwd" tabindex="2" autocomplete="off" name="Passwd" size="20" type="password"/></div><br/><input id="signin-btn-ns" tabindex="0" value="Sign in" class="ubtn ubtn-block" name="submit" type="submit"/></form><span style="font-size: 80%">Widget edited by <a href="http://anangku.blogspot.com/2008/11/blogger-login-form-widget.html">Anang </a></span>
4.kemudian simpan
5.coba lihat blog anda sekarang.akan ada tampilan seperti ini

Read More..
Kamis, 18 Desember 2008
Menampilkan tanggal hari ini
coba anda lihat di blog ini bagian kanan atas.disana ada tanggal hari ini.tanggal itu akan berubah mengikuti tanggan pada hari saat anda membuka blog ini.bagaimana cara membuat tanggal seperti itu?
1.Login di Blogger
2.Langsung menuju edit HTML
3.Copy paste kode dibawah, dan simpan diantara kode ]]></b:skin> dan </head>
<script type='text/javascript' src='http://mizwar.blog.googlepages.com/tampil_tanggal.js'></script>
maka akan jadi seperti ini :
sekarang kita menuju ke langkah ke dua :
1.masuk ke layout-page element
2.copy code dibawah ini :
<script>tampiltanggal();</script>
Read More..
1.Login di Blogger
2.Langsung menuju edit HTML
3.Copy paste kode dibawah, dan simpan diantara kode ]]></b:skin> dan </head>
<script type='text/javascript' src='http://mizwar.blog.googlepages.com/tampil_tanggal.js'></script>
maka akan jadi seperti ini :
]]></b:skin>
<script type='text/javascript' src='http://mizwar.blog.googlepages.com/tampil_tanggal.js'></script>
</head>
sekarang kita menuju ke langkah ke dua :
1.masuk ke layout-page element
2.copy code dibawah ini :
<script>tampiltanggal();</script>
3.anda bisa bebas meletakkan kode tersebut dibagian mana dari blog anda
selamat mencoba!!
Read More..
Blog lebih baik dari pada website ?
- Budaya Blog
 og adalah sebuah halaman website yang dinamis bukan statis, yang membuat blog lebih dicintai oleh mesin pencari.
Sebuah blog adalah tempat untuk menuliskan ide, menuliskan berita, menulikan pengalaman dan menuliskan harapan sehingga kegiatan seperti ini akan menumbuhkan rasa kebahagiaan tersendiri, tak jarang para blogger akan bertahan terus dalam kegiatan ini walaupun tanpa mendapatkan imbalan apapun.
Sebenarnya blog adalah sebuah ajang untuk berkreasi.
- Ciri khas Blog
Yaitu artikel ditampilkan secara berurutan menurut waktu penerbitannya (penulisannya), artikel yang terbaru akan diposisikan paling atas kemudian berurutan menuju artikel yang lebih lama, karena sebuah blogg pada hakikatnya adalah perkembangan dari sebuah jurnal atau diary online. Sehingga sebuah blog adalah sebuah website yang dinamis karena kontennya selalu berubah-ubah, tak seperti website normal yang halamannya tak pernah berubah. Hal inilah yang menyebabkan kepopuleran blog melebihi blog statis.
Adanya ruang untuk berkomentar
Sebuah ruang komentar selalu ada dalam setiap artikel (content) yang ditulis, inilah kekuatan dari sebuah blog sebagai media untuk membuat jaringan pertemanan. Ruang komentar menjadi alat komunikasi dua arah, para pembaca bisa dengan mudah berkomunikasi dengan penulis content, membawa pembicaraan yang dimulai dari sebuah artikel menjadi sebuah komunitas.
Kemudahan dalam posting
Website biasa (tradisional) mempunyai satu masalah kronis yaitu terlalu teknis, yang menghalangi orang untuk menambahkan content baru, meskipun sudah CMS (Content Management System) yang canggih, pembuatan website masih diluar jangkauan pengguna web awam. Dengan blog maka maka masalah ini bisa teratasi. Blog menyediakan sebuah sistem publikasi content yang begitu mudah digunakan oleh kebanyakan pengguna web, dengan sedikit latihan saja para blogger sudah bisa mempublikasikan content ke World Wide Web.
Sering terupdate
Karena kemudahan posting dan adanya komentar dalam sebuah blog maka seringkali sebuah blog akan terupdate berulang kali dalam sehari, dengan asumsi bahwa isi content bernilai dan konsisten maka secara otomatis para pengunjung akan berulangkali ‘mampir’ karena mereka mendapatkan apa yang mereka butuhkan yang berarti akan meningkatkan traffic dan rangking pada mesin pencari.Dan perkecualian untuk blog
Jika ciri khas blog di atas dikombinasikan maka sebuah blog mempunyai kekuatan yang luar biasa, tidak hanya sebagai tempat bersenang-senang untuk mengekspresikan ide tetapi lebih dari itu yaitu sebagai ruang pemasaran produk yang potensial. Sebuah blog relatif lebih cepat mendapatkan perhatian daripada website normal. Sebuah blog akan semakin meningkat pengunjungnya jika mempunyai content bernilai dan dibutuhkan. Karena adanya ruang komentar maka sebuah blog sangat cepat sekali membangun sebuah komunitas di dunia cyber. Inilah yang menjadi perhatian khusus oleh para pebisnis dan pemasar internet terhadap sebuah blog. Read More..
Rabu, 17 Desember 2008
Memasang Widget Translator
Jika blog anda berbahasa indonesia kebanyakan pengunjung yang datang pasti adalah orang indonesia.tapi kadangkala ada beberapa pengunjung luar negri yang secara gak sengaja nyasar ke blog anda.setelah melihat dan membaca isi dari blog anda,otomatis mereka tidak akan mengerti maksudnya.kerena mereka tidak mengerti bahasa yan ganda gunakan.untuk membuat hal itu tidak terjadi.anda bisa memasang widget translator ke dalam blog anda.
sehingga ketika anda orang luar negri datang berkunjung ke blog anda,mereka tidak akan kebingungan membaca isi dari blog anda.
cara memesang Widget Translator
1. Login ke Blogger trus pilih menu "Layout" atau "Tata Letak"
2. Kemudian klik pada "Add Gadget" atau "tambah gadget=".
3. Lalu pilih HTML/Javascript"
4. Kemudian masukkan script berikut ini kedalamnya.
<script src="http://www.gmodules.com/ig/ifr?url=http://www.google.com/ig/modules/translatemypage.xml&up_source_language=id&w=160&h=60&title=&border=&output=js"></script>
5.kemudian simpan
Read More..
Selasa, 16 Desember 2008
Tampilan judul tanpa postingan
Berapakah jumlah atikel/tulisan yang telah anda tulis di blog milik anda?bagi anda yang telah lama berkecimpung di dunia bloging..pasti tulisan yang ada di blog sudah sangat banyak sekali.hal ini tentu akan merepotkan jika ada pengunjung yang melakukan pencarian artikel di blog anda lalu hasil pencarian menunjukkan ada 100 atikel/tulisan yang berhubungan.akan membutuhkan waktu yang sangat lama memunculkan semua artikel/tulisan tersebut.hal ini akan sangat merugikan pengunjung,mereka harus bersabar menunggu hingga semuanya terbuka..bagaimana jika koneksi yang mereka gunakan sangat lambat.maka halaman blog anda akan terasa lama sekali loadingnya.sudah dapat kita tebak pengunjung akan langsung menutup blog anda dan meninggalkannya begitu saja.kebanyakan pengunjung blog hanya akan menunggu sekitar 20 detik untuk membuka 1 halaman blog.jika lewat dari itu..mereka akan langsung pergi meninggalkan blog anda.
untuk mengatasi hal seperti itu,ada baiknya jika hasil pencarian hanya memunculkan judul beserta tanggal posting.sehingga tampilan halaman blog akan lebih menghemat waktu untuk dibuka.
lihat contoh seperti dibawah ini :

sekarang kita langsung menuju ke langkah langkah pembuatannya
1.kita akan bermain main dengan html template blog anda.untuk memperkecil resiko gagal,ada baiknya anda membackup terlebih dahulu template anda
2.masuk ke layout-edit html-klik "expand widget templates"
3.cari kode dibawah ini:
<data:adStart/>
<b:loop values='data:posts' var='post'>
<b:if cond='data:post.dateHeader'>
<h2 class='date-header'><data:post.dateHeader/></h2>
</b:if>
<b:include data='post' name='post'/>
perhatikan kode yang dicetak tebal ( <b:include data='post' name='post'/> ).jika susah mencarinya.clik ctrl f dan ketikkan kata yang ingin dicari
4.setelah kita ketemu kode yang dicetak tebal.ganti kode tersebut dengan kode dibawah ini:
<b:if cond='data:blog.homepageUrl !=
data:blog.url'>
<b:if cond='data:blog.pageType != "item"'>
<a expr:href='data:post.url'>
<data:post.title/></a><br/><br/>
<b:else/>
<b:include data='post' name='post'/>
</b:if>
<b:else/>
<b:include data='post' name='post'/>
</b:if>
5.kemudian klik save(simpan)
6.silahkan lihat hasilnya.coba klik salah satu label di blog anda.maka label tersebut akan menampilkan semua postingan hanya berupa judul dan tanggal postingannya saja.
Read More..
Senin, 15 Desember 2008
Memasang "tips of the day" pada blog
untuk membuat blog kita terlihat lebih profesional,kita bisa menambahkan "tips of the day" di blog kita.tips of the day adalah tips singkat yang ditulis oleh pemilik blog kepada pengunjung.tips of the day bisa berisi tips memasak,tips kesehatan,tips keuangan dan masih banyak lagi.tips tips seperti itu pasti akan sangat menarik perhatian pengunjung sehingga mereka tidak bosan berkunjug ke blog anda.karena mereka bisa mendapatkan tips tips singkat yang berguna ketika berkunjung ke blog anda.tips of the day disini bukan tips yang akan disampaikan setiap hari.melainkan tips tips ini akan selalu berganti ketika pengunjung merefresh atau reload halaman blog anda.
ternyata cara buatnya tidak terlalu susah kok.cukup ikuti langkah dibawah ini:
1.perhatikan kode dibawah ini
<a href="http://www.o-om.com">
<img border="0" style="float:left; margin:0 5px 5px 0;cursor:pointer; cursor:hand;" alt="http://www.o-om.com" src="http://www.geocities.com/oom_directory/tipsOftheday.gif"/></a>
<font color="#333333"><b>Did You Know...</b>
<script language="JavaScript">
//store the quotations in arrays
tips = new Array(5);
tips[0] = "<i>tips...1</i>";
tips[1] = "<i>tips...2</i>";
tips[2] = "<i>tips...3</i>";
tips[3] = "<i>tips...4</i>";
tips[4] = "<i>tips...5</i>";
//calculate a random index
index = Math.floor(Math.random() * tips.length);
//display the quotation
document.write("\n");
document.write(tips[index]);
//done
</script>
</font>
<a href="javascript:location.reload(true)"> »»</a> <a target="_blank" href="http://www.o-om.com/2007/12/cara-buat-random-tips-of-day.html">(?)</a>
<br/>
catatan penting:
ada beberapa kode yang tidak boleh diubah seperti.
tulisan yang berwarna biru merupakan kode untuk mereload atau merefresh tips tersebut sehingga akan selalu terganti tulisan yang boleh diganti
tulisan yang boleh diganti
1..tulisan yang berwarna merah adalah tampilan text.ini boleh anda ubah sesuai keinginana anda
2. tulisan berwarna hijau merupakan tampilan logo.logo tersebut bisa anda ganti dengan gambar yang anda inginkan.caranya tinggal copy alamat gambar yang telah anda upload dan paste di tempat itu
Bagaimana jika anda ingin menambah tips of the day yang akan ditampilkan.caranya di bawah ini:
kode di bawah ini berarti anda hanya akan menampilkan 5 tips dalam blog anda
tips = new Array(5);
tips[0] = "<i>tips...1</i>";
tips[1] = "<i>tips...2</i>";
tips[2] = "<i>tips...3</i>";
tips[3] = "<i>tips...4</i>";
tips[4] = "<i>tips...5</i>";
jika anda ingin menambah 7 tips ataupun 20 tips..tinggal ganti "new Array"menjadi "(7)" kemudian tinggal tulis aja tips2 nya sebanyak 7.yang harus di ingat adalah jumlah tips dihitung mulai dari 0(nol) bukan 1 (satu)..makanya hasilnya akan jadi seperti ini :
tips = new Array(7);
tips[0] = "<i>tips...1</i>";
tips[1] = "<i>tips...2</i>";
tips[2] = "<i>tips...3</i>";
tips[3] = "<i>tips...4</i>";
tips[4] = "<i>tips...5</i>";
tips[5] = "<i>tips...6</i>";
tips[6] = "<i>tips...7</i>";
2.setelah anda selesai mengedit kode tersbut..silahkan copy kode tersebut kedalam blog anda.caranya :
masuk ke layout-page element-add gadgets-add htm/java code-langsung paste kode tadi disana.lalu save
3.anda bisa melihat blog anda sekarang.tips of the day telah muncul di blog anda.coba reload atau efresh blog anda maka tips of the day akan langsung berganti ke tips lainnya
source : o-om.com
Read More..
Minggu, 14 Desember 2008
membuat related post(tulisan yang berhubungan)
Banyak manfaat yang bisa kita dapatkan bila kita meletakkan related post di blog kita.pengunjung jadi bisa membaca artikel lain yang masih berhubungan dengan artikel yang sedang dia baca.letaknya di setiap akhir postingan.
cara untuk membuat related post cukup mudah kok.ikuti langkah langkah berkut ini:
1.login ke blogger
2.masuk ke bagian layout-edit html
3.centang pada kotak "expand widgets template"
4.kemudian copy script dibawah ini :
<b:if cond='data:blog.pageType == "item"'>
<div class='similiar'>
<div class='widget-content'>
<h3>Related Posts by Categories</h3>
<div id='data2007'/><br/><br/>
<script type='text/javascript'>
var homeUrl3 = "<data:blog.homepageUrl/>";
var maxNumberOfPostsPerLabel = 4;
var maxNumberOfLabels = 10;
maxNumberOfPostsPerLabel = 100;
maxNumberOfLabels = 3;
function listEntries10(json) {
var ul = document.createElement('ul');
var maxPosts = (json.feed.entry.length <= maxNumberOfPostsPerLabel) ?
json.feed.entry.length : maxNumberOfPostsPerLabel;
for (var i = 0; i < maxPosts; i++) {
var entry = json.feed.entry[i];
var alturl;
for (var k = 0; k < entry.link.length; k++) {
if (entry.link[k].rel == 'alternate') {
alturl = entry.link[k].href;
break;
}
}
var li = document.createElement('li');
var a = document.createElement('a');
a.href = alturl;
if(a.href!=location.href) {
var txt = document.createTextNode(entry.title.$t);
a.appendChild(txt);
li.appendChild(a);
ul.appendChild(li);
}
}
for (var l = 0; l < json.feed.link.length; l++) {
if (json.feed.link[l].rel == 'alternate') {
var raw = json.feed.link[l].href;
var label = raw.substr(homeUrl3.length+13);
var k;
for (k=0; k<20; k++) label = label.replace("%20", " ");
var txt = document.createTextNode(label);
var h = document.createElement('b');
h.appendChild(txt);
var div1 = document.createElement('div');
div1.appendChild(h);
div1.appendChild(ul);
document.getElementById('data2007').appendChild(div1);
}
}
}
function search10(query, label) {
var script = document.createElement('script');
script.setAttribute('src', query + 'feeds/posts/default/-/'
+ label +
'?alt=json-in-script&callback=listEntries10');
script.setAttribute('type', 'text/javascript');
document.documentElement.firstChild.appendChild(script);
}
var labelArray = new Array();
var numLabel = 0;
<b:loop values='data:posts' var='post'>
<b:loop values='data:post.labels' var='label'>
textLabel = "<data:label.name/>";
var test = 0;
for (var i = 0; i < labelArray.length; i++)
if (labelArray[i] == textLabel) test = 1;
if (test == 0) {
labelArray.push(textLabel);
var maxLabels = (labelArray.length <= maxNumberOfLabels) ?
labelArray.length : maxNumberOfLabels;
if (numLabel < maxLabels) {
search10(homeUrl3, textLabel);
numLabel++;
}
}
</b:loop>
</b:loop>
</script>
</div>
</div>
</b:if>
5.cari kode berikut
<data:post.body/>
6.paste script yang tadi anda copy tepat dibawah tulisan "<data:post.body/>"
7.jika anda menggunakan read more..biasanya akan ada 2 buah kode.nah letakkan kodenya dibawah kode yang pertama.
8.kemudian di save..silahkan lihat hasilnya....
Read More..
Sabtu, 13 Desember 2008
cara memasang yahoo messenger di blog
Saya berapa kali ditanyain oleh orang melalui Yahoo messenger tentang cara nampilin status Yahoo Messenger.Makanya kali ini saya akan mencoba memberitahu cara nampilin status YM
kita di blog.Jadi setiap kali pengunjung yang datang ke blog anda akan tahu apakah anda sedang online atau offline.
Caranya gampang sekali..
anda hanya perlu meletakkan sepotong script di dalam HTML kita.Scriptnya adalah:
<a href="ymsgr:sendim?andi.kaneshir0">
<img border=0 scr="http://opi.yahoo.com/
online?u=andi.kaneshir0&m=g&t=2"/></a>
Setelah anda copy script itu...silahkan ganti id yahoo saya andi.kaneshir0 dengan id yahoo anda.lalu andapun bisa menampilkan variasi gambar mulai dari angka 0 sampai 5.untuk gambar yang saya pake di blog ini,saya pake gambar 2 dengan kode t=2....kamu bisa ganti dengan t=1,t=2,t=3,t=4,t=5...bisa anda coba sendiri...
Jika anda menggunakan blogger..cara masukin scriptnya adalah sebagai berikut:
1.login ke account blogger anda
2.pilih layout-page element-add page element-add HTML
3.letakkan script itu disana...
Selamat mencoba...
Read More..
Jumat, 12 Desember 2008
Digital SLR Camera: Pentax K-m
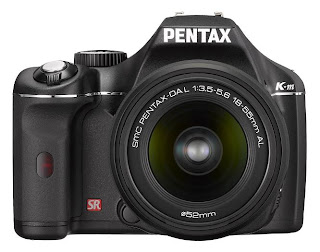 Pentax overview of the Pentax K-m model: "Designed primarily for beginning digital SLR photographers, this new entry-class model offers simplified, user-friendly operation, and an easy-to-maneuver compact, lightweight body. The PENTAX K-m was developed as an entry-class digital SLR camera offering simple, straightforward operation, making it possible for first-time digital SLR users and family photographers to enjoy high-quality digital SLR photography with little trouble or confusion."
User-friendly functionalities:
- Compact, lightweight body for enhanced portability and maneuverability
- Simplified operation system for easy camera handling
- PENTAX-original Shake Reduction mechanism for sharp, blur-free images
- Comprehensive Dust Removal system with prevention, removal and confirmation devices
- Auto Picture mode for automatic selection of optimum shooting mode
- High-quality image 10.2 effective Megapixels
- High-speed continuous shooting at approx. 3.5 frames per second
- High-precision 5-point AF system
- Auto sensitivity control up to ISO 3200
- Large, easy-to-view 2.7-inch LCD monitor
- Digital filters for unique visual expressions
Pentax Detailed Description of Pentax K-m:
An Easy-to-Operate, Entry-Class Digital SLR Camera Featuring Shake Reduction, Scene-Specific Shooting Modes and an Array of User-Friendly Functions in a Compact, Lightweight Body.
HOYA CORPORATION PENTAX Imaging Systems Division is pleased to announce the launch of the PENTAX K-m digital SLR camera. Designed primarily for beginning digital SLR photographers, this new entry-class model offers simplified, user-friendly operation, and an easy-to-maneuver compact, lightweight body.
The PENTAX K-m was developed as an entry-class digital SLR camera offering simple, straightforward operation, making it possible for first-time digital SLR users and family photographers to enjoy high-quality digital SLR photography with little trouble or confusion.
It features an upgraded version of the PENTAX-original Auto Picture mode, which automatically detects the type of subject or scene, and sets the proper shooting mode for the photographer. It also features a host of advanced features and sophisticated functions — including the innovative in-body Shake Reduction mechanism — to assist the photographer. It also offers a compact, lightweight body, designed by incorporating PENTAX’s advanced downsizing technologies, accumulated over the years of digital SLR development, into different body parts. As a result, the PENTAX K-m assures simple operation and outstanding operability, even for inexperienced first-time digital SLR users.
Along with the PENTAX K-m, PENTAX will also launch two DA L-series interchangeable zoom lenses: the smc PENTAX-DA L 18-55mmF3.5-5.6AL and the smc PENTAX-DA L 50-200mmF4-5.6ED. Designed for exclusive use with PENTAX digital SLR cameras, these DA L-series lenses are designed to be more compact and lightweight than conventional counterparts, without sacrificing any of the exceptional optical performance common to all PENTAX lenses.
Main Features
1. Compact, lightweight body for enhanced portability and maneuverability:
Despite the incorporation of a large-sized image sensor (23.5mm by 15.7mm), the PENTAX K-m offers a compact, lightweight body to assure remarkable portability and maneuverability. This was made possible by the development of a compact, lightweight and high-rigidity stainless-steel chassis, the downsizing of the Shake Reduction mechanism and circuit boards, the employment of latest high-density packaging technologies assuring most efficient positioning and layout of various parts, and the repositioning of the battery compartment. The camera grip has also been redesigned to assure firm, comfortable hold of the camera body.
2. Simplified operation system for easy camera handling:
The PENTAX K-m features a newly designed control system, which positions most of buttons and levers on the camera’s grip side, making it easier for first-time digital SLR users stepping up from their compact models to operate the camera. What’s more, the functions of each button or lever are instantly displayed on the camera’s LCD monitor with a single press of the help button to facilitate camera operation — especially for those who are unfamiliar with digital SLR cameras.
3. PENTAX-original Shake Reduction mechanism for sharp, blur-free images:
The PENTAX K-m comes equipped with the PENTAX-developed SR (Shake Reduction) mechanism, which effectively reduces camera shake for sharp, blur-free images even under demanding shooting conditions — such as when using a telephoto lens, shooting in the dark or at night without supplementary flash illumination, or using extended exposures for sunset scenes. This innovative SR mechanism shifts the position of the image sensor vertically and horizontally at high speed using magnetic force, while adjusting the shifting speed in proportion to the amount of camera shake detected by a built-in sensor. It offers an outstanding compensation effect — up to the equivalent of approximately four shutter steps. As a result, it does not require special anti-shake lenses, and can be used with almost all existing PENTAX interchangeable lenses.
4. Comprehensive Dust Removal system with prevention, removal and confirmation devices:
The PENTAX K-m features the user-friendly DR (Dust Removal) system to prevent dust from appearing on captured images. Applied to the CCD image sensor surface (or low-pass filter) through the vapor deposition process of a fluorine compound, the PENTAX-original SP (Super Protect) coating effectively removes dust and stains from the surface. In the next step, dust that still remains on the surface will be shaken off when the SR system shifts the image sensor at high speed. Finally, the dust that is shaken off the image sensor will fall onto an adhesive sheet positioned at the bottom of the SR unit, eliminating any possibility of it returning to the image sensor surface. This DR system even offers a Dust Alert function, which allows the user to confirm the dust-adhesion status of the CCD in advance.
5. Auto Picture mode for automatic selection of optimum shooting mode:
The PENTAX-developed Auto Picture mode is programmed to automatically select the most appropriate shooting mode — from such choices as Portrait, Landscape and Macro — for a given subject. With the PENTAX K-m, this user-friendly mode is further upgraded, with automatic detection of situations requiring the Night Scene Portrait mode. Since all camera settings, including aperture, shutter speed, white balance, saturation, contrast and sharpness, are automatically adjusted by the camera for optimum results, the user can concentrate on image composition and shutter opportunity.
6. High-quality image:
The PENTAX K-m combines a large, high-performance CCD image sensor (23.5mm by 15.7mm) with the sophisticated PRIME (PENTAX Real Image Engine) as its imaging engine. With its approximately 10.2 effective megapixels, it produces beautiful, fine-detailed images with subtle gradations and delicate texture description. It also features a Custom Image function, which offers a choice of six finishing touches to help the user create intended images.
7. High-speed continuous shooting at approx. 3.5 frames per second:
The PENTAX K-m lets the user keep shooting images at the speed of approximately 3.5 frames per second (in the JPEG recording format), allowing the user to capture a sequence of a fast-moving subject with great ease.
8. High-precision 5-point AF system:
The PENTAX K-m incorporates a five-point wide-area AF system (SAFOX VIII with five cross-type sensors) to assure dependable, high-precision autofocusing. Using the five sensors positioned in a cross pattern over the image field (one in the middle, two at sides, and two at top and bottom), this system automatically and unfailingly selects the optimum sensor for a given subject. It also allows the user to fix the AF detection point at the middle sensor. Thanks to a thorough review of the AF algorithm, this AF system also offers improved autofocusing speed under poor-lighting conditions, in which conventional AF systems take longer to focus on the subject.
9. Auto sensitivity control up to ISO 3200:
The PENTAX K-m’s auto sensitivity control function automatically sets the optimum sensitivity between ISO 100 and ISO 3200, based on such data as the subject’s brightness level and the lens’ focal length. Since this function allows the user to take advantage of faster shutter speeds in poor lighting situations (such as indoor sports events and nighttime scenes), it helps the photographer to effectively reduce camera shake and subject shake and prevent blurred images.
10. Effective gradation compensation:
The PENTAX K-m’s dynamic-range expansion function allows the user to expand a dynamic range (or a range of gradation reproduction) to minimize white-washed areas in the image. On the other hand, its shadow compensation function minimizes pitch-black areas lacking details. Combined, they help the user to produce beautiful, rich-gradation images when shooting high-contrast subjects.
11. Large, easy-to-view 2.7-inch LCD monitor:
The PENTAX K-m features a large 2.7-inch color LCD monitor with approximately 230,000 dots on its back panel. This monitor’s wide-view design allows the photographer to check the on-screen image from approximately 170 degrees both vertically and horizontally. It even offers digital zooming of playback images up to 16 times for easy confirmation of the image’s focusing status and details.
12. Bright, clear viewfinder:
Thanks to a combination of a lightweight penta-mirror prism, a PENTAX-original finder optics and the acclaimed Natural-Bright-Matte focusing screen, the PENTAX K-m’s viewfinder delivers a large, bright subject image with an approximately 96-percent field of view and an approximately 0.85-times magnification.
13. Digital filters for unique visual expressions:
The PENTAX K-m’s built-in digital filters let the user effortlessly add some creative and artistic touches to recorded images — without the use of a PC. The user can select one of 14 different digital filters — including the new Toy Camera and Retro filters — to create a desired visual effect. Read More..
cara membuat search engine di blog
Search engine adalah mesin pencari yang bisa anda gunakan untuk mencari apapun.alangkah praktisnya kalo di blog kita tersedia fasilitas search engine...maka jika ada pengunjung yang datang,mereka tinggal mengetikkan judul artikel yang ingin mereka baca di search engine yang telah kita sediakan blog.dalam sekejap judul tulisan yang mereka ketik akan muncul.hal ini akan sangat menghemat waktu ketimbang harus mencari satu persatu didalam arcieve blog.pengunjung akan senang dan mereka pasti akan datang lagi lain waktu.hal ini akan menjadi nilai plus untuk menaikkan traffic blog anda.
masalahnya sekarang..gimana cara memasang fasilitas pintar itu?tenang saja dalam artikel ini saya akan menunjukkan cara membuat search engine di blog.
1.login ke blogger.com
2.masuk ke layout-Page element
3.didalam menu page element pilih add a gadget
4.setelah itu muncul layar baru...klik HTML/Javascript

5.copy kode tersebut
<form action="http://nama-blogmu.blogspot.com/search"
method="get"> <input class="textinput" name="q" size="30" type="text"/> <input value="search" class="buttonsubmit" name="submit" type="submit"/></form>
ganti tulisan "nama-blogmu.blogspot.com" dengan alamat blog anda.
untuk memeperkecil ukuran panjang kotak search engine..tinggal ganti angka 30 nya
Read More..
Digital SLR Camera: Canon EOS 5D Mark II
 The EOS 5D Mark II digital SLR is Canon's 21.1 Megapixel with full frame CMOS sensor. Canon writes that to be the "ultimate in creative shooting, the EOS 5D Mark II features a full frame CMOS sensor (36mm x 24mm). With no cropping or magnification effects, enjoy a true wide angle experience through the large, bright viewfinder. Redesigned pixels minimise noise, while a 21.1 Megapixel resolution surpasses the standards demanded by the leading picture agencies...The full frame EOS 5D Mark II combines outstanding resolution with 3.9 fps shooting and superlative high ISO performance. The addition of Full HD movie recording expands the boundaries of photography."
Main Features:
- 21.1MP full frame CMOS sensor
- DIGIC 4 processor
- ISO range expandable to 25600
- Full HD (1080, 30fps) movie recording
- High-res 3.0” VGA LCD with Live View
- 3.9fps JPEG shooting up to card capacity
- 9-point AF + 6 Assist AF points
- Magnesium alloy body
Canon's Detailed Description of Canon EOS 5D Mark II:
21.1 Megapixel full frame CMOS sensor
For the ultimate in creative shooting, the EOS 5D Mark II features a full frame CMOS sensor (36mm x 24mm). With no cropping or magnification effects, enjoy a true wide angle experience through the large, bright viewfinder. Redesigned pixels minimise noise, while a 21.1 Megapixel resolution surpasses the standards demanded by the leading picture agencies.
DIGIC 4
Canon’s DIGIC 4 works with the EOS 5D Mark II’s image sensor to deliver outstanding reproduction of colours and subtle tonal gradations. DIGIC 4 also delivers split-second start-up times, Face Detection AF in Live View mode, and additional HD movie recording.
High ISO
For handheld shooting in low light, the EOS 5D Mark II offers ISO speeds of up to 6400. For dark scenes where using flash is undesirable, this can be expanded to an incredible ISO 25600.
Full HD movie recording
The EOS 5D Mark II complements outstanding still imaging capabilities with Full HD (1080) video recording. Users can even shoot video to memory card without losing the ability to capture still images. An HDMI connection allows High Definition playback of footage and images on an HDTV.
3.0” High Resolution LCD
The 3.0” Clear View LCD features 920,000 dot resolution, wide viewing angle and dual anti-reflective coatings – allowing ultra-detailed image review in a variety of conditions. Live View displays real-time images on the LCD, offering three types of auto focus: Quick AF, Live AF, and Face Detection Live AF, which locks onto faces detected in the frame.
Up to 3.9 frames per second
The EOS 5D Mark II offers continuous shooting at 3.9 frames per second. When shooting JPEGs to a UDMA card, maximum burst is limited only by card capacity.
9-point AF + 6 Assist AF points
Precision auto focus is assured by Canon’s AF system, which employs 9 selectable points and 6 Assist AF points.
EOS Integrated Cleaning System
Canon’s built-in dust prevention system offers three ways of guarding images against the effects of dust: reduction of internal dust generation; an in-camera sensor cleaning mechanism; and the ability to map stubborn dust spots for removal with Digital Photo Professional software (included).
Durable, compact design
With a magnesium alloy construction, environmental protection and shutter durability of 150,000 releases, the EOS 5D Mark II is equally suited to location or studio work. Read More..
Digital SLR Camera: Panasonic Lumix DMC-G1
 Panasonic describes that the Lumix DMC-G1 is as "easy to use as a compact digital camera, with the stunning photo quality of a digital SLR camera. It's a new-generation digital interchangeable lens camera that does away with the mirror box and complies with the new Micro Four Thirds System standard. In short, the G1 writes an entirely new chapter in the evolution of the digital interchangeable lens camera...The G1's Full-time Live View is revolutionary. It lets you see in the LCD how adjusting the exposure, white balance, aperture and even the shutter speed will affect the photo. This kind of super-easy live view shooting has never before been possible with a conventional digital SLR camera."
Main Technical Specs:
- Intelligent Auto (iA) Mode: MEGA O.I.S., Intelligent ISO Control, Face Detection, Intelligent Scene Selector, Light Detection, AF Tracking
- Camera Effective Pixels: 12.1 Mega Pixels
- Optical Image Stabilizer: MEGA O.I.S.
- Image Sensor: 13.1 Total Mega Pixels, Live MOS Sensor, Primary Color Filter
- Image Sensor Size: 17.3 x 13.0mm
- Dust Reduction System: Supersonic wave filter
- Focal Length: f=14mm to 45mm (35mm film camera equivalent 28mm to 90mm)
- Lens Construction: 12 elements in 9 groups (1 Aspherical lens)
- Aperture Type: 7 diaphragm blades / Circular aperture diaphragm
- Aperture Range: F3.5 (Wide) - F5.6 (Tele), Minimum Aperture F22
Additional Description for Panasonic Lumix DMC-G1:
Micro Four Thirds: The open standard that led to the mirror-less body
The G1 adopts the Micro Four Thirds System standard, developed as an extended version of the Four Thirds System standard for digital camera systems. Using this standard, and developing a camera body that eliminates the mirror box and optical viewfinder unit, we managed to reduce the lens mount diameter by about 6 mm (compared with the conventional Four Thirds camera) and shorten the flange-back distance by about half. The result is a digital interchangeable lens camera that's both extremely compact and
highly mobile.
iA Mode automatically adjusts settings to fit the shooting condition
If you've hesitated to buy a digital SLR camera because you think they're hard to use, your wait is over. Intelligent Auto mode activates 6 detection and compensation functions that work automatically, leaving you free to just aim and shoot.
Shake detection - MEGA O.I.S.
Helps prevent blurring when the camera shakes.
Motion detection - Intelligent ISO Control
Helps prevent blur caused by subject motion.
Light detection - Intelligent Exposure
Adjusts the brightness of dark areas in the image.
Advanced Face - Detection Face Detection AF/AE
Helps deliver clear portraits.
Scene detection - Intelligent Scene Selector
Selects the optimal scene mode for the situation.
Subject detection - AF Tracking
AF Tracking follows moving subjects and adjusts accordingly.
3.0-inch free-angle LCD with high 460,000-dot resolution
The large 3.0-inch LCD rotates 180° horizontally and 270° vertically, making it easy for you to capture dynamic shots from extreme angles without getting into an awkward position. And when the lighting around you changes, the LCD backlighting level automatically changes too, so you get comfortable, easy-on-the-eyes viewing at all times.
My Color mode puts you in control of the color
In My Color mode you can freely adjust the color, brightness and saturation of an image, while checking it with Full-time Live View. This gives you the power to control how your image will look. You can even make dramatic color changes.
Film mode - To capture photos with a special mood or expressiveness
Much like changing the film type in a film camera, you can enjoy a wide range of expression based on six color modes and three monochromatic modes. When the multi-film mode is selected, you can record pictures having up to three different effects with each press of the shutter button.
1920 x 1080-pixel HD (high-definition) photo recording
The G1 shoots wide-screen, 16:9, full-HD images. These images are simply breathtaking when displayed on an HDTV, which handles about four times the data of a standard-definition TV. Enjoy a whole new style of HDTV viewing with family and friends.
HD output-ready for the HDTV age
Just connect your G1 to an HDTV and you're ready for high definition viewing. If your TV is HDMI compatible, a single HDMI mini cable (optional) is all you need. Even better, with a Panasonic VIERA HDTV, you can also operate the G1 with the VIERA remote control for even easier viewing. Read More..
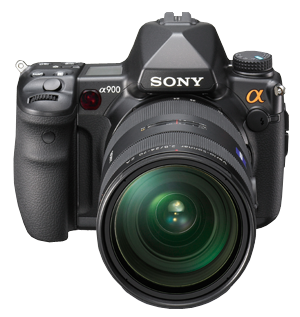
Digital SLR Camera: Sony DSLR A900
 Sony's description of the new DSLR A900: "The new standard in digital photography has arrived with the Sony α (alpha) DSLR-A900. Packed with features, this flagship DSLR is the first α (alpha) to incorporate a 35mm full frame image sensor and 24.6-megapixel resolution. It also incorporates the world's first body-integrated, full-size SteadyShot INSIDE™ image stabilization technology.You'll also experience a larger capture area, improved wide-angle performance and tighter depth of field control with the new full frame Exmor™ CMOS image sensor. Equipped with Dual BIONZ™ imaging processors, the alpha A900 delivers continuous shooting up to 5 fps with superb image quality and ultra-low noise. The A900 also offers a large, ultra-bright glass pentaprism viewfinder with 100 percent coverage, a 3.0-inch Xtra Fine LCD™ display and HDMI™ output with PhotoTV HD compatibility."
35mm full frame 24.6MP Exmor™ CMOS image sensor
The A900 features a 35mm full frame Exmor™ CMOS image sensor that is approximately 2.35x larger than the APS-C sized sensors found in many DSLR cameras. The result is a larger capture area, improved wide angle performance, and tighter depth of field control. In addition, its 24.6MP resolution maximizes the resolving power of your existing lenses and delivers sharper, higher contrast photos.
SteadyShot INSIDE™ in-camera image stabilization:
Building on years of expertise, Sony has developed the world’s first body-integrated image stabilization solution for a full frame DSLR1. The SteadyShot INSIDE™ in-camera image stabilizer actually shifts the image sensor to compensate for camera shake without sacrificing image quality. The compensation effect is equal to as many as four shutter speed steps, giving you more creative freedom when shooting in low light. And, because it is integrated into the camera body, SteadyShot INSIDE technology works with all compatible ? (alpha)system lenses.
Dual BIONZ™ processors for up to fast 5fps performance:
The A900 harnesses the power of Dual BIONZ™ image processing engines to deliver true-to-life images with ultra-low noise and continuous shooting at up to 5 fps.
Ultra bright, 100% coverage glass pentaprism viewfinder
A large, ultra bright glass pentaprism viewfinder provides you with amazing clarity and high optical performance for tighter focus control. In addition, it offers viewfinder magnification of 0.74x, allowing you to see an image nearer to its actual size, as well as 100% field coverage for detailed framing work.
Intelligent Preview Function
The Intelligent Preview function allows you to see the effects of manual adjustments to exposure value, shutter speed, aperture, Dynamic Range Optimizer and White Balance before you take the shot, so you can determine the optimum settings before you take the shot, instead of losing time to trial-and-error.
3.0” Xtra Fine LCD™2 (921K pixels)
Review your images in stunning detail on the 3.0” Xtra Fine LCD™2 display (921k pixels). With photo-quality resolution of 270ppi(pixels per inch), you can identify any necessary focus or exposure corrections at the time of capture, rather than discovering them when you transfer your images to your PC.
PhotoTV HD viewing w/ HDMI™ output
The A900 provides direct HDMI™ output to your BRAVIA® HDTV and other compatible HDTV screens, so you can view and share photos in breathtaking clarity and detail3. Additionally, PhotoTV HD capable BRAVIA® HDTVs will automatically optimize display settings, such as sharpness, gradation, and color to display your images in a way that more closely matches the natural look of printed photographs3.
Precise and fast 9-point AF system w/ 10 point assist
A high-performance autofocus system uses 9 focus points (center dual-cross type) and 10 assist points to deliver fast and precise focusing.
Flagship design
The A900 features an impressive design befitting a premium flagship model. The simple form eschews ornamentation and exudes competence, while the iconic pentaprism design element conveys superior optical performance. The A900 also incorporates a distinctive cinnabar-colored ring circling the lens mount – a design element shared across every ? (alpha) DSLR camera.
Rugged magnesium alloy shell
The body of the A900 is entirely covered in a die-cast magnesium alloy shell, providing a rugged feel and surprisingly light weight.
Moisture/dust-resistant design
Sealed viewfinder optics and rubber gasket surrounds on all buttons, dials, and switches help resist the entry of dust and moisture into the camera, and allow for safe use in a wide range of environments.
Battery Performance
A supplied InfoLITHIUM® lithium-ion battery provides long-lasting performance, allowing you to capture approximately 880 images on a single charge7.
Durable Shutter Design
The shutter mechanism in the A900 is designed to achieve shutter speeds up to 1/8000 seconds and proven for 100,000 cycle operation.
Dual Card Slots
The A900 features a dual card slots and accepts both CompactFlash® and Memory Stick Duo™ Media (sold separately).
40-Segment Multi-Pattern Metering
A 40-segment multi-pattern metering system provides superior exposure control accuracy in a wide range of lighting conditions.
Dynamic Range Optimizer
To recover details in dark or bright areas of the image, the A900 provides multiple levels of Dynamic Range Optimization: Standard mode, to improve shadow detail using standard gamma curves; Advanced Auto mode, allowing you to select any of 5 DRO correction levels, or DRO Advanced Bracketing, which automatically takes three shots at different DRO levels with a single shutter press.
On-Chip Column A/D Conversion
Analog-to-digital signal conversion is performed by the full frame Exmor™ CMOS image sensor.
Dual Noise Reduction Processing
In addition to digitizing analog signals, the full frame Exmor™ CMOS image sensor also performs both analog and digital noise reduction. This on-chip dual noise reduction process aids in the high speed transfer of noiseless digital signals.
F2.8 Sensor
The autofocus system in the A900 features a highly accurate F2.8 sensor for improved focus precision when using lenses faster than F2.8.
Updated Image Data Converter SR3
Updated Image Data Converter SR3 software4 improves your workflow with faster RAW file processing and improved image correction.
APS-C Size Capturing
In addition to full frame image capture, the A900 can also crop images to the APS-C size format, allowing the use of lenses designed specifically for APS-C sized image sensors5.
Viewfinder magnification of 0.74x
Viewfinder magnification of 0.74x lets you see your subjects nearer to actual size.
Eyepiece Shutter
The A900 includes a built-in eyepiece shutter which can be shut to help shield against entering light and prevent exposure errors.
AF Micro Adjustment
AF Micro Adjustment allows you to fine tune focus for various lenses6. The A900 can store adjusted focus values for up to thirty lenses.
Optional Focusing Screens (sold separately)
User-replaceable focusing screens for shooting specific subject types can be purchased as optional accessories.
Mirror Lockup Mode
Mirror Lockup Mode raises the main mirror before exposure to reduce vibration at shutter release, resulting in better performance during long exposure shots of fireworks, stars, etc.
2EV Exposure Bracketing (3 exposures)
The A900 allows you to bracket up to three exposures in 2.0EV-step increments.
Rubberized Grip
Sony drew upon its extensive experience designing and building heavy professional broadcasting camcorders to develop a rubberized grip that allows you to hold the A900 with comfort and confidence.
Image Data Lightbox software
The Image Data Lightbox software4 included with your ? (alpha) DSLR helps you browse, rate, and compare your images, making it easier to select your favorites for further processing.
Remote Camera Control
Remote Camera Control allows you to control your A900 from your PC.
Picture Motion Browser (PMB) Software
Sony® Picture Motion Browser (PMB) software4 provides a simple and intuitive way to sort and archive your image collection, as well as perform common editing operations and output to data disc or the Web.
Convenient Button Placement
Concentrate on your shooting and make adjustments on the fly thanks to convenient button placement. The ISO and White Balance adjustment buttons are located on the top of the camera body near the shutter button for easy thumb operation. Read More..
Digital SLR Camera: Pentax K200D
 According to Pentax, the Pentax K200D model is designed "mainly for family users and digital camera beginners, this popular-class model offers a host of user-friendly features and sophisticated functions like higher-class models. As a result, even digital camera beginners can enjoy advanced digital SLR photography with great ease."
Main Features:
- PENTAX-original SR (Shake Reduction) mechanism for sharp, blur-free images
- High quality 10.2 MP CCD sensor and Pentax PRIME (PENTAX Real Image Engine)
- Dust-proof, water-resistant construction
- Large 2.7-inch, 230,000 dot, wide-view LCD monitor
- Energy saving design
- Simultaneous recording of RAW- and JPEG-format images
- In-body development of recorded RAW-format images
Main Technical Specifications:
- Camera Type: TTL autofocus, auto-exposure digital SLR digital-still camera with built-in retractable P-TTL auto pop-up flash
- Effective Pixels: 10.2 megapixels
- Sensor Type: 23.5mm x 15.7mm Interline interlace CCD with a primary colour filter
- Sensitivity: Auto, Manual : 100�`1600 (1EV steps or 1/2EV steps or 1/3EV steps)
- Colour Depth: 8 bit (JPEG) or 12 bit (RAW)
- Still Image Size: JPEG: [10M] 3872 x 2592 pixels, [6M] 3008 x 2000 pixels, [2M] 1824 x 1216 pixels; RAW: [10M] 3872 x 2592 pixels
- File Format: RAW (Original Pentax PEF and DNG), JPEG (Conforms to Exif 2.21), Conforms to DCF (Design rule of Camera File system) 2.0
- Lens Mount: PENTAX KAF2 bayonet mount
- Usable lenses: PENTAX KAF2-, KAF-, and KA-mount lenses.
- Shutter Type: Electronically controlled vertical-run focal plane shutter
- Shutter Speed: 1/4000 - 30 sec. and bulb
- External Storage Media: SD memory card, SDHC memory card
- External LCD Panel Indication: (1) Shutter speed, (2) Aperture, (3) Flash mode (Flash-On, Red-eye reduction, Auto discharge, Auto, Flash Off), (4) Drive mode (Single frame/Continuous/Self-Timer/Auto bracket/Remote control), (5) EV compensation, (6) Battery level, (7) White balance, (8) ISO warning, (9) RAW/RAW+JPEG caputure, (10) Number of recordable images
- Viewfinder Type: Fixed molded penta-mirror type
- Viewfinder Focusing Screen: Natural-Bright-Matte II focusing screen
- Viewfinder Indication: (1) AF frame, (2) Spot AF frame, (3) Focus point indication (high lighted in red), (4) Shake Reduction, (5) Flash status, (6) Shutter speed, (7) Aperture, (8) Focus indicator, (9) Manual focus, (10) EV compensation, (11) AE lock indicator, (12) ISO warning; (13) Number of recordable images/EV compensation/Confirm sensitivity
Excerpt from Pentax K200D Press Release:
With an easy-to-use interface housed in a compact body, the new PENTAX K200D contains all the advanced imaging technology of the award winning K10D and is designed for users who may be unfamiliar with DSLR cameras but want a camera that will allow them to grow as they learn about photography. With 10.2 megapixels and a 2.7 inch wide view LCD, this model features many of the award winning advancements of the PENTAX Series including:
- Auto Picture and Scene modes that offer shooting ease, while advanced modes, such as the Sv mode, allow photographers to grow with the camera.
- A weather and dust resistant body, unique in this class of cameras, that allows photographers to keep shooting even in harsh conditions.
- Custom Image functions that allow users to select between six preset options and further adjust image processing, including saturation, hue, contrast and sharpness. The K200D also offers an Expanded Dynamic Range function that allows users to gain more contrast and detail in bright settings.
- An improved Dust Reduction system that features the new Dust Alert function to pinpoint the exact location of dust particles for the photographer to remove.
- A PENTAX-developed Shake Reduction (SR) system for sharp, blur-free images even under difficult shooting conditions, such as macro and telephoto photography or low light settings without a flash.
Kamis, 11 Desember 2008
membuat tulisan berjalan
Bagi anda yang sering berkunjung ke blog ini pasti sering melihat efek tulisan berjalan yang berada di bagian atas.Sebenarnya untuk membuat efek ini tidaklah sulit karena kita tidak memerlukan keahlian HTML yang tinggi.efek tulisan seperti ini biasanya disebut marquee.Efek inipun ada bermacam macam.Anda tidak hanya bisa membuat tulisan berjalan kekiri tapi andapun bisa membuat tulisan berjalan kebawah dan keatas.
baiklah saya akan langsung mengajarkan anda bagaimana cara membuat efek seperti ini.
Yang perlu anda lakukan adalah menyalin script ini ke HTML blog anda.
1.membuat tulisan berjalan kekiri
<marquee direction="left">text</marquee>
2.membuat tulisan berjalan ke kanan
<marquee direction="right">text</marquee>
3.membuat tulisan berjalan ke bawah
<marquee direction="down">text</marquee>
4.membuat tulisan berjalan ke atas
<marquee direction="up">text</marquee>
Sebagai catatan..trik memakai teks berjalan seperti ini sangat efektif jika kita ingin tulisan kita bisa di lirik oleh pembaca.karena tulisan yang bergerak seperti ini lebih menarik mata pembaca daripada teks yang diam..semoga bermanfaat...
Read More..
Rabu, 03 Desember 2008
Hi Gurpreet Sing ---- just close ur meta tag end w...
Hi Gurpreet Sing ----
just close ur meta tag end with '/' symbol
example : like this .... content=""/> Read More..
just close ur meta tag end with '/' symbol
example : like this .... content=""/> Read More..
Selasa, 02 Desember 2008
Dear I tried It But When I Saved My Template I Got...
Dear I tried It But When I Saved My Template I Got The Following Error Please Help me.
"Your template could not be parsed as it is not well-formed. Please make sure all XML elements are closed properly.
XML error message: The element type "META" must be terminated by the matching end-tag ""." Read More..
"Your template could not be parsed as it is not well-formed. Please make sure all XML elements are closed properly.
XML error message: The element type "META" must be terminated by the matching end-tag ""." Read More..
The Sexy Bipasha Basu
Bipasha Basu born on January 7th, 1979 in New Delhi, India is a marvelous Bollywood actress and a celebrated supermodel.
Bipasha Basu, who was considered an ugly duckling in her childhood, stepped into her teens slowly transforming herself into a super vivacious angelic beauty as she grew. In 1996, at the age of seventeen, the beautiful Bipasha won the Ford's Supermodel of the World Contest in 1996 and earned a trip to New York. After being featured in Vogue magazine, she had a wonderful opportunity to go places in international modelling. But all she cared for was her parents and her two sisters and so she gave up everything and returned back to India.
In fact she seriously wanted to become a doctor first. But the very thought of rats, cutting them to pieces to study their anatomy, made her sick to the guts. So she dropped the idea of becoming a doctor and instead tried to pursue Chartered Accountancy soon after graduation. But destiny, as usual, had other plans for her. She became Ford's Supermodel at seventeen and soon attracted the attention of Bollywood.
Bipasha Basu began her movie career with "Ajnabee" in 2001 wherein she portrayed the role of a married woman trying to seduce her hubby's friend, who is also married. Her brilliant performance in the movie brought her the Filmfare Best Debut Award. The wonderful actress, who by a quirk of fate hit the limelight in Bollywood, got busier in demonstrating her acting prowess in movies after movies and went on to win awards, accolades and laurels from critics and the audience alike.
Here The Sexy Bipasha Basu Pictures
Read More..
Bipasha Basu, who was considered an ugly duckling in her childhood, stepped into her teens slowly transforming herself into a super vivacious angelic beauty as she grew. In 1996, at the age of seventeen, the beautiful Bipasha won the Ford's Supermodel of the World Contest in 1996 and earned a trip to New York. After being featured in Vogue magazine, she had a wonderful opportunity to go places in international modelling. But all she cared for was her parents and her two sisters and so she gave up everything and returned back to India.
In fact she seriously wanted to become a doctor first. But the very thought of rats, cutting them to pieces to study their anatomy, made her sick to the guts. So she dropped the idea of becoming a doctor and instead tried to pursue Chartered Accountancy soon after graduation. But destiny, as usual, had other plans for her. She became Ford's Supermodel at seventeen and soon attracted the attention of Bollywood.
Bipasha Basu began her movie career with "Ajnabee" in 2001 wherein she portrayed the role of a married woman trying to seduce her hubby's friend, who is also married. Her brilliant performance in the movie brought her the Filmfare Best Debut Award. The wonderful actress, who by a quirk of fate hit the limelight in Bollywood, got busier in demonstrating her acting prowess in movies after movies and went on to win awards, accolades and laurels from critics and the audience alike.
Here The Sexy Bipasha Basu Pictures
 |  |
 |  |
Langganan:
Postingan (Atom)
