
Jika blog anda berbahasa indonesia kebanyakan pengunjung yang datang pasti adalah orang indonesia.tapi kadangkala ada beberapa pengunjung luar negri yang secara gak sengaja nyasar ke blog anda.setelah melihat dan membaca isi dari blog anda,otomatis mereka tidak akan mengerti maksudnya.kerena mereka tidak mengerti bahasa yan ganda gunakan.untuk membuat hal itu tidak terjadi.anda bisa memasang widget translator ke dalam blog anda.
sehingga ketika anda orang luar negri datang berkunjung ke blog anda,mereka tidak akan kebingungan membaca isi dari blog anda.
cara memesang Widget Translator
1. Login ke Blogger trus pilih menu "Layout" atau "Tata Letak"
2. Kemudian klik pada "Add Gadget" atau "tambah gadget=".
3. Lalu pilih HTML/Javascript"
4. Kemudian masukkan script berikut ini kedalamnya.
<script src="http://www.gmodules.com/ig/ifr?url=http://www.google.com/ig/modules/translatemypage.xml&up_source_language=id&w=160&h=60&title=&border=&output=js"></script>
5.kemudian simpan
Read More..
Rabu, 17 Desember 2008
Selasa, 16 Desember 2008
Tampilan judul tanpa postingan
Berapakah jumlah atikel/tulisan yang telah anda tulis di blog milik anda?bagi anda yang telah lama berkecimpung di dunia bloging..pasti tulisan yang ada di blog sudah sangat banyak sekali.hal ini tentu akan merepotkan jika ada pengunjung yang melakukan pencarian artikel di blog anda lalu hasil pencarian menunjukkan ada 100 atikel/tulisan yang berhubungan.akan membutuhkan waktu yang sangat lama memunculkan semua artikel/tulisan tersebut.hal ini akan sangat merugikan pengunjung,mereka harus bersabar menunggu hingga semuanya terbuka..bagaimana jika koneksi yang mereka gunakan sangat lambat.maka halaman blog anda akan terasa lama sekali loadingnya.sudah dapat kita tebak pengunjung akan langsung menutup blog anda dan meninggalkannya begitu saja.kebanyakan pengunjung blog hanya akan menunggu sekitar 20 detik untuk membuka 1 halaman blog.jika lewat dari itu..mereka akan langsung pergi meninggalkan blog anda.
untuk mengatasi hal seperti itu,ada baiknya jika hasil pencarian hanya memunculkan judul beserta tanggal posting.sehingga tampilan halaman blog akan lebih menghemat waktu untuk dibuka.
lihat contoh seperti dibawah ini :

sekarang kita langsung menuju ke langkah langkah pembuatannya
1.kita akan bermain main dengan html template blog anda.untuk memperkecil resiko gagal,ada baiknya anda membackup terlebih dahulu template anda
2.masuk ke layout-edit html-klik "expand widget templates"
3.cari kode dibawah ini:
<data:adStart/>
<b:loop values='data:posts' var='post'>
<b:if cond='data:post.dateHeader'>
<h2 class='date-header'><data:post.dateHeader/></h2>
</b:if>
<b:include data='post' name='post'/>
perhatikan kode yang dicetak tebal ( <b:include data='post' name='post'/> ).jika susah mencarinya.clik ctrl f dan ketikkan kata yang ingin dicari
4.setelah kita ketemu kode yang dicetak tebal.ganti kode tersebut dengan kode dibawah ini:
<b:if cond='data:blog.homepageUrl !=
data:blog.url'>
<b:if cond='data:blog.pageType != "item"'>
<a expr:href='data:post.url'>
<data:post.title/></a><br/><br/>
<b:else/>
<b:include data='post' name='post'/>
</b:if>
<b:else/>
<b:include data='post' name='post'/>
</b:if>
5.kemudian klik save(simpan)
6.silahkan lihat hasilnya.coba klik salah satu label di blog anda.maka label tersebut akan menampilkan semua postingan hanya berupa judul dan tanggal postingannya saja.
Read More..
Senin, 15 Desember 2008
Memasang "tips of the day" pada blog
untuk membuat blog kita terlihat lebih profesional,kita bisa menambahkan "tips of the day" di blog kita.tips of the day adalah tips singkat yang ditulis oleh pemilik blog kepada pengunjung.tips of the day bisa berisi tips memasak,tips kesehatan,tips keuangan dan masih banyak lagi.tips tips seperti itu pasti akan sangat menarik perhatian pengunjung sehingga mereka tidak bosan berkunjug ke blog anda.karena mereka bisa mendapatkan tips tips singkat yang berguna ketika berkunjung ke blog anda.tips of the day disini bukan tips yang akan disampaikan setiap hari.melainkan tips tips ini akan selalu berganti ketika pengunjung merefresh atau reload halaman blog anda.
ternyata cara buatnya tidak terlalu susah kok.cukup ikuti langkah dibawah ini:
1.perhatikan kode dibawah ini
<a href="http://www.o-om.com">
<img border="0" style="float:left; margin:0 5px 5px 0;cursor:pointer; cursor:hand;" alt="http://www.o-om.com" src="http://www.geocities.com/oom_directory/tipsOftheday.gif"/></a>
<font color="#333333"><b>Did You Know...</b>
<script language="JavaScript">
//store the quotations in arrays
tips = new Array(5);
tips[0] = "<i>tips...1</i>";
tips[1] = "<i>tips...2</i>";
tips[2] = "<i>tips...3</i>";
tips[3] = "<i>tips...4</i>";
tips[4] = "<i>tips...5</i>";
//calculate a random index
index = Math.floor(Math.random() * tips.length);
//display the quotation
document.write("\n");
document.write(tips[index]);
//done
</script>
</font>
<a href="javascript:location.reload(true)"> »»</a> <a target="_blank" href="http://www.o-om.com/2007/12/cara-buat-random-tips-of-day.html">(?)</a>
<br/>
catatan penting:
ada beberapa kode yang tidak boleh diubah seperti.
tulisan yang berwarna biru merupakan kode untuk mereload atau merefresh tips tersebut sehingga akan selalu terganti tulisan yang boleh diganti
tulisan yang boleh diganti
1..tulisan yang berwarna merah adalah tampilan text.ini boleh anda ubah sesuai keinginana anda
2. tulisan berwarna hijau merupakan tampilan logo.logo tersebut bisa anda ganti dengan gambar yang anda inginkan.caranya tinggal copy alamat gambar yang telah anda upload dan paste di tempat itu
Bagaimana jika anda ingin menambah tips of the day yang akan ditampilkan.caranya di bawah ini:
kode di bawah ini berarti anda hanya akan menampilkan 5 tips dalam blog anda
tips = new Array(5);
tips[0] = "<i>tips...1</i>";
tips[1] = "<i>tips...2</i>";
tips[2] = "<i>tips...3</i>";
tips[3] = "<i>tips...4</i>";
tips[4] = "<i>tips...5</i>";
jika anda ingin menambah 7 tips ataupun 20 tips..tinggal ganti "new Array"menjadi "(7)" kemudian tinggal tulis aja tips2 nya sebanyak 7.yang harus di ingat adalah jumlah tips dihitung mulai dari 0(nol) bukan 1 (satu)..makanya hasilnya akan jadi seperti ini :
tips = new Array(7);
tips[0] = "<i>tips...1</i>";
tips[1] = "<i>tips...2</i>";
tips[2] = "<i>tips...3</i>";
tips[3] = "<i>tips...4</i>";
tips[4] = "<i>tips...5</i>";
tips[5] = "<i>tips...6</i>";
tips[6] = "<i>tips...7</i>";
2.setelah anda selesai mengedit kode tersbut..silahkan copy kode tersebut kedalam blog anda.caranya :
masuk ke layout-page element-add gadgets-add htm/java code-langsung paste kode tadi disana.lalu save
3.anda bisa melihat blog anda sekarang.tips of the day telah muncul di blog anda.coba reload atau efresh blog anda maka tips of the day akan langsung berganti ke tips lainnya
source : o-om.com
Read More..
Minggu, 14 Desember 2008
membuat related post(tulisan yang berhubungan)
Banyak manfaat yang bisa kita dapatkan bila kita meletakkan related post di blog kita.pengunjung jadi bisa membaca artikel lain yang masih berhubungan dengan artikel yang sedang dia baca.letaknya di setiap akhir postingan.
cara untuk membuat related post cukup mudah kok.ikuti langkah langkah berkut ini:
1.login ke blogger
2.masuk ke bagian layout-edit html
3.centang pada kotak "expand widgets template"
4.kemudian copy script dibawah ini :
<b:if cond='data:blog.pageType == "item"'>
<div class='similiar'>
<div class='widget-content'>
<h3>Related Posts by Categories</h3>
<div id='data2007'/><br/><br/>
<script type='text/javascript'>
var homeUrl3 = "<data:blog.homepageUrl/>";
var maxNumberOfPostsPerLabel = 4;
var maxNumberOfLabels = 10;
maxNumberOfPostsPerLabel = 100;
maxNumberOfLabels = 3;
function listEntries10(json) {
var ul = document.createElement('ul');
var maxPosts = (json.feed.entry.length <= maxNumberOfPostsPerLabel) ?
json.feed.entry.length : maxNumberOfPostsPerLabel;
for (var i = 0; i < maxPosts; i++) {
var entry = json.feed.entry[i];
var alturl;
for (var k = 0; k < entry.link.length; k++) {
if (entry.link[k].rel == 'alternate') {
alturl = entry.link[k].href;
break;
}
}
var li = document.createElement('li');
var a = document.createElement('a');
a.href = alturl;
if(a.href!=location.href) {
var txt = document.createTextNode(entry.title.$t);
a.appendChild(txt);
li.appendChild(a);
ul.appendChild(li);
}
}
for (var l = 0; l < json.feed.link.length; l++) {
if (json.feed.link[l].rel == 'alternate') {
var raw = json.feed.link[l].href;
var label = raw.substr(homeUrl3.length+13);
var k;
for (k=0; k<20; k++) label = label.replace("%20", " ");
var txt = document.createTextNode(label);
var h = document.createElement('b');
h.appendChild(txt);
var div1 = document.createElement('div');
div1.appendChild(h);
div1.appendChild(ul);
document.getElementById('data2007').appendChild(div1);
}
}
}
function search10(query, label) {
var script = document.createElement('script');
script.setAttribute('src', query + 'feeds/posts/default/-/'
+ label +
'?alt=json-in-script&callback=listEntries10');
script.setAttribute('type', 'text/javascript');
document.documentElement.firstChild.appendChild(script);
}
var labelArray = new Array();
var numLabel = 0;
<b:loop values='data:posts' var='post'>
<b:loop values='data:post.labels' var='label'>
textLabel = "<data:label.name/>";
var test = 0;
for (var i = 0; i < labelArray.length; i++)
if (labelArray[i] == textLabel) test = 1;
if (test == 0) {
labelArray.push(textLabel);
var maxLabels = (labelArray.length <= maxNumberOfLabels) ?
labelArray.length : maxNumberOfLabels;
if (numLabel < maxLabels) {
search10(homeUrl3, textLabel);
numLabel++;
}
}
</b:loop>
</b:loop>
</script>
</div>
</div>
</b:if>
5.cari kode berikut
<data:post.body/>
6.paste script yang tadi anda copy tepat dibawah tulisan "<data:post.body/>"
7.jika anda menggunakan read more..biasanya akan ada 2 buah kode.nah letakkan kodenya dibawah kode yang pertama.
8.kemudian di save..silahkan lihat hasilnya....
Read More..
Sabtu, 13 Desember 2008
cara memasang yahoo messenger di blog
Saya berapa kali ditanyain oleh orang melalui Yahoo messenger tentang cara nampilin status Yahoo Messenger.Makanya kali ini saya akan mencoba memberitahu cara nampilin status YM
kita di blog.Jadi setiap kali pengunjung yang datang ke blog anda akan tahu apakah anda sedang online atau offline.
Caranya gampang sekali..
anda hanya perlu meletakkan sepotong script di dalam HTML kita.Scriptnya adalah:
<a href="ymsgr:sendim?andi.kaneshir0">
<img border=0 scr="http://opi.yahoo.com/
online?u=andi.kaneshir0&m=g&t=2"/></a>
Setelah anda copy script itu...silahkan ganti id yahoo saya andi.kaneshir0 dengan id yahoo anda.lalu andapun bisa menampilkan variasi gambar mulai dari angka 0 sampai 5.untuk gambar yang saya pake di blog ini,saya pake gambar 2 dengan kode t=2....kamu bisa ganti dengan t=1,t=2,t=3,t=4,t=5...bisa anda coba sendiri...
Jika anda menggunakan blogger..cara masukin scriptnya adalah sebagai berikut:
1.login ke account blogger anda
2.pilih layout-page element-add page element-add HTML
3.letakkan script itu disana...
Selamat mencoba...
Read More..
Jumat, 12 Desember 2008
Digital SLR Camera: Pentax K-m
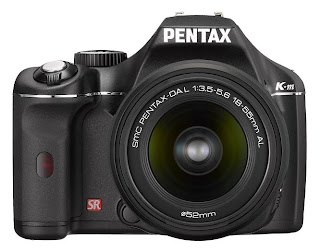 Pentax overview of the Pentax K-m model: "Designed primarily for beginning digital SLR photographers, this new entry-class model offers simplified, user-friendly operation, and an easy-to-maneuver compact, lightweight body. The PENTAX K-m was developed as an entry-class digital SLR camera offering simple, straightforward operation, making it possible for first-time digital SLR users and family photographers to enjoy high-quality digital SLR photography with little trouble or confusion."
User-friendly functionalities:
- Compact, lightweight body for enhanced portability and maneuverability
- Simplified operation system for easy camera handling
- PENTAX-original Shake Reduction mechanism for sharp, blur-free images
- Comprehensive Dust Removal system with prevention, removal and confirmation devices
- Auto Picture mode for automatic selection of optimum shooting mode
- High-quality image 10.2 effective Megapixels
- High-speed continuous shooting at approx. 3.5 frames per second
- High-precision 5-point AF system
- Auto sensitivity control up to ISO 3200
- Large, easy-to-view 2.7-inch LCD monitor
- Digital filters for unique visual expressions
Pentax Detailed Description of Pentax K-m:
An Easy-to-Operate, Entry-Class Digital SLR Camera Featuring Shake Reduction, Scene-Specific Shooting Modes and an Array of User-Friendly Functions in a Compact, Lightweight Body.
HOYA CORPORATION PENTAX Imaging Systems Division is pleased to announce the launch of the PENTAX K-m digital SLR camera. Designed primarily for beginning digital SLR photographers, this new entry-class model offers simplified, user-friendly operation, and an easy-to-maneuver compact, lightweight body.
The PENTAX K-m was developed as an entry-class digital SLR camera offering simple, straightforward operation, making it possible for first-time digital SLR users and family photographers to enjoy high-quality digital SLR photography with little trouble or confusion.
It features an upgraded version of the PENTAX-original Auto Picture mode, which automatically detects the type of subject or scene, and sets the proper shooting mode for the photographer. It also features a host of advanced features and sophisticated functions — including the innovative in-body Shake Reduction mechanism — to assist the photographer. It also offers a compact, lightweight body, designed by incorporating PENTAX’s advanced downsizing technologies, accumulated over the years of digital SLR development, into different body parts. As a result, the PENTAX K-m assures simple operation and outstanding operability, even for inexperienced first-time digital SLR users.
Along with the PENTAX K-m, PENTAX will also launch two DA L-series interchangeable zoom lenses: the smc PENTAX-DA L 18-55mmF3.5-5.6AL and the smc PENTAX-DA L 50-200mmF4-5.6ED. Designed for exclusive use with PENTAX digital SLR cameras, these DA L-series lenses are designed to be more compact and lightweight than conventional counterparts, without sacrificing any of the exceptional optical performance common to all PENTAX lenses.
Main Features
1. Compact, lightweight body for enhanced portability and maneuverability:
Despite the incorporation of a large-sized image sensor (23.5mm by 15.7mm), the PENTAX K-m offers a compact, lightweight body to assure remarkable portability and maneuverability. This was made possible by the development of a compact, lightweight and high-rigidity stainless-steel chassis, the downsizing of the Shake Reduction mechanism and circuit boards, the employment of latest high-density packaging technologies assuring most efficient positioning and layout of various parts, and the repositioning of the battery compartment. The camera grip has also been redesigned to assure firm, comfortable hold of the camera body.
2. Simplified operation system for easy camera handling:
The PENTAX K-m features a newly designed control system, which positions most of buttons and levers on the camera’s grip side, making it easier for first-time digital SLR users stepping up from their compact models to operate the camera. What’s more, the functions of each button or lever are instantly displayed on the camera’s LCD monitor with a single press of the help button to facilitate camera operation — especially for those who are unfamiliar with digital SLR cameras.
3. PENTAX-original Shake Reduction mechanism for sharp, blur-free images:
The PENTAX K-m comes equipped with the PENTAX-developed SR (Shake Reduction) mechanism, which effectively reduces camera shake for sharp, blur-free images even under demanding shooting conditions — such as when using a telephoto lens, shooting in the dark or at night without supplementary flash illumination, or using extended exposures for sunset scenes. This innovative SR mechanism shifts the position of the image sensor vertically and horizontally at high speed using magnetic force, while adjusting the shifting speed in proportion to the amount of camera shake detected by a built-in sensor. It offers an outstanding compensation effect — up to the equivalent of approximately four shutter steps. As a result, it does not require special anti-shake lenses, and can be used with almost all existing PENTAX interchangeable lenses.
4. Comprehensive Dust Removal system with prevention, removal and confirmation devices:
The PENTAX K-m features the user-friendly DR (Dust Removal) system to prevent dust from appearing on captured images. Applied to the CCD image sensor surface (or low-pass filter) through the vapor deposition process of a fluorine compound, the PENTAX-original SP (Super Protect) coating effectively removes dust and stains from the surface. In the next step, dust that still remains on the surface will be shaken off when the SR system shifts the image sensor at high speed. Finally, the dust that is shaken off the image sensor will fall onto an adhesive sheet positioned at the bottom of the SR unit, eliminating any possibility of it returning to the image sensor surface. This DR system even offers a Dust Alert function, which allows the user to confirm the dust-adhesion status of the CCD in advance.
5. Auto Picture mode for automatic selection of optimum shooting mode:
The PENTAX-developed Auto Picture mode is programmed to automatically select the most appropriate shooting mode — from such choices as Portrait, Landscape and Macro — for a given subject. With the PENTAX K-m, this user-friendly mode is further upgraded, with automatic detection of situations requiring the Night Scene Portrait mode. Since all camera settings, including aperture, shutter speed, white balance, saturation, contrast and sharpness, are automatically adjusted by the camera for optimum results, the user can concentrate on image composition and shutter opportunity.
6. High-quality image:
The PENTAX K-m combines a large, high-performance CCD image sensor (23.5mm by 15.7mm) with the sophisticated PRIME (PENTAX Real Image Engine) as its imaging engine. With its approximately 10.2 effective megapixels, it produces beautiful, fine-detailed images with subtle gradations and delicate texture description. It also features a Custom Image function, which offers a choice of six finishing touches to help the user create intended images.
7. High-speed continuous shooting at approx. 3.5 frames per second:
The PENTAX K-m lets the user keep shooting images at the speed of approximately 3.5 frames per second (in the JPEG recording format), allowing the user to capture a sequence of a fast-moving subject with great ease.
8. High-precision 5-point AF system:
The PENTAX K-m incorporates a five-point wide-area AF system (SAFOX VIII with five cross-type sensors) to assure dependable, high-precision autofocusing. Using the five sensors positioned in a cross pattern over the image field (one in the middle, two at sides, and two at top and bottom), this system automatically and unfailingly selects the optimum sensor for a given subject. It also allows the user to fix the AF detection point at the middle sensor. Thanks to a thorough review of the AF algorithm, this AF system also offers improved autofocusing speed under poor-lighting conditions, in which conventional AF systems take longer to focus on the subject.
9. Auto sensitivity control up to ISO 3200:
The PENTAX K-m’s auto sensitivity control function automatically sets the optimum sensitivity between ISO 100 and ISO 3200, based on such data as the subject’s brightness level and the lens’ focal length. Since this function allows the user to take advantage of faster shutter speeds in poor lighting situations (such as indoor sports events and nighttime scenes), it helps the photographer to effectively reduce camera shake and subject shake and prevent blurred images.
10. Effective gradation compensation:
The PENTAX K-m’s dynamic-range expansion function allows the user to expand a dynamic range (or a range of gradation reproduction) to minimize white-washed areas in the image. On the other hand, its shadow compensation function minimizes pitch-black areas lacking details. Combined, they help the user to produce beautiful, rich-gradation images when shooting high-contrast subjects.
11. Large, easy-to-view 2.7-inch LCD monitor:
The PENTAX K-m features a large 2.7-inch color LCD monitor with approximately 230,000 dots on its back panel. This monitor’s wide-view design allows the photographer to check the on-screen image from approximately 170 degrees both vertically and horizontally. It even offers digital zooming of playback images up to 16 times for easy confirmation of the image’s focusing status and details.
12. Bright, clear viewfinder:
Thanks to a combination of a lightweight penta-mirror prism, a PENTAX-original finder optics and the acclaimed Natural-Bright-Matte focusing screen, the PENTAX K-m’s viewfinder delivers a large, bright subject image with an approximately 96-percent field of view and an approximately 0.85-times magnification.
13. Digital filters for unique visual expressions:
The PENTAX K-m’s built-in digital filters let the user effortlessly add some creative and artistic touches to recorded images — without the use of a PC. The user can select one of 14 different digital filters — including the new Toy Camera and Retro filters — to create a desired visual effect. Read More..
cara membuat search engine di blog
Search engine adalah mesin pencari yang bisa anda gunakan untuk mencari apapun.alangkah praktisnya kalo di blog kita tersedia fasilitas search engine...maka jika ada pengunjung yang datang,mereka tinggal mengetikkan judul artikel yang ingin mereka baca di search engine yang telah kita sediakan blog.dalam sekejap judul tulisan yang mereka ketik akan muncul.hal ini akan sangat menghemat waktu ketimbang harus mencari satu persatu didalam arcieve blog.pengunjung akan senang dan mereka pasti akan datang lagi lain waktu.hal ini akan menjadi nilai plus untuk menaikkan traffic blog anda.
masalahnya sekarang..gimana cara memasang fasilitas pintar itu?tenang saja dalam artikel ini saya akan menunjukkan cara membuat search engine di blog.
1.login ke blogger.com
2.masuk ke layout-Page element
3.didalam menu page element pilih add a gadget
4.setelah itu muncul layar baru...klik HTML/Javascript

5.copy kode tersebut
<form action="http://nama-blogmu.blogspot.com/search"
method="get"> <input class="textinput" name="q" size="30" type="text"/> <input value="search" class="buttonsubmit" name="submit" type="submit"/></form>
ganti tulisan "nama-blogmu.blogspot.com" dengan alamat blog anda.
untuk memeperkecil ukuran panjang kotak search engine..tinggal ganti angka 30 nya
Read More..
Langganan:
Postingan (Atom)
